Manage - Expert/Admin
- Manage Summary
- Organization Details
- Organization Logo
- Admins
- Reports
- Edit Report
- Explore
- Organization Shortcode
You perform the top level management tasks with the Manage section of your navigation bar. This is where you set up Admin control, and create and edit the reports and wizards that shape your people’s experience.
Organization Details
Organization Details encompasses three pieces of information about your organization; two of which you are able to edit.
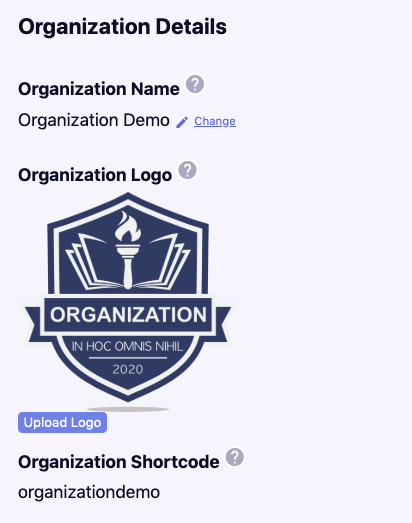
Organization Name
Organization Name is the name of your organization. We would have set this up together when we created your organization. Your organization name is visible to everyone in your organization and to everyone who may view a report from our system.
Edit Organization Name
You can edit your organization name by clicking “Change” next to the pencil icon. Make your changes and click the blue checkmark. A confirmation message will appear at the top of your screen stating, “Successfully updated the organization name to your new organization name.”
{info} If you edit your organization’s name, it will change everywhere your organization name is used across our system’s materials.
Organization Logo
Similar to your organization name, your organization logo is used on all reports you distribute to anyone via your organization. To optimize the appearance of your logo across media, we recommend:
- A horizontal logo, with a max width of 500px.
- The ideal size is 500px x 250px.
- The file type must be a JPG, PNG, or GIF.
Edit Logo

You can edit your organization logo by clicking the blue “Upload Logo” button under the Organization Logo heading and then clicking the “Choose File” button to choose a new file to upload. When you are finished, click the blue “Submit” button.
Organization Shortcode
Organization Shortcode was another thing that we set up for you when we created your organization. It’s another piece of code that identifies this organization out of all the organizations within our assessment system. We use this shortcode name in part of the website link that you send to your people to direct them to the pages that are specifically for this organization.
If you’re changing your organization’s name, and want to also change the shortcode so that people don’t see the old organization’s name in the email links, contact us we will change it for you manually.
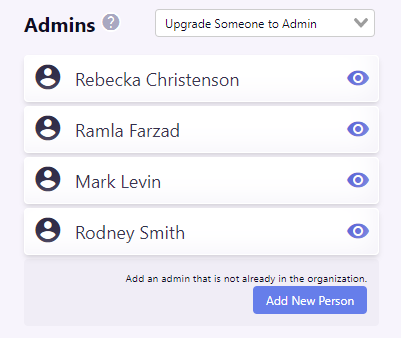
Admins
The Admins area is where you view, grant, and revoke Admin authorization.
What is an Admin?
An Admin has the authority to make changes to an organization and access all of the information in an organization. They can make changes like adding, editing and deleting people, groups, wizards, reports, organizational details and other admins. Admins can also view any person or group’s raw data, history, personal information, and reports (interpretations of the data collected for an individual or group).
View Admin Detail
If you click either the name or the eye icon on a name card, you will go to that Admin’s detail page from which you can view all data associated with that person.
Granting Admin Authorization
Anyone you grant Admin authorization will have the same privileges you that you do to create, update, and remove content from this organization as well as to read any of the data and interpretations of that data for any individual or group therein.
You can grant someone Admin Authority either when adding them to your organization or from the Admins area of the Manage section if they are already within your organization.
Upgrade a Person to an Admin

Above the Admins list is a drop down menu that says, “Upgrade Someone to Admin.” If you click it a list of all the people within your organization, alphabetized by first name will drop down. Scroll to and select the person to whom you want to grant Admin authorization. The person’s name will appear in the menu’s box and beside it will be options to either cancel the transaction (an X icon), go back to scrolling through the list of names (the V icon), and to confirm your selection (he check icon). If you choose to confirm your selection, then a green confirmation notice will pop up at the top of the page that says, “Successfully updated this person’s admin status” and that person’s name will be added to the Admins list.
Add a New Person AND Make Them an Admin
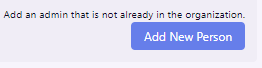
Beneath the Admins list is a blue button that says, “Add New Person.” Clicking this will allow you to make someone an Admin at the same time that you add them as a person into the organization. In other words, this is what you want to do when you want to, “Add an admin that is not already in the organization.”
When adding a new person whom you wish to make an Admin, whether you are adding them from the People or Manage sections, you will be redirected to the “Add New Person” page on which you can check a box that asks, “Make this person an Admin?” If you choose to confirm your selection, then a green confirmation notice will pop up at the top of the page that says, “Successfully updated this person’s admin status” and that person’s name will be added to the Admins list.
Read more about the Add New Admin page.
Removing Admin Authorization
You can remove a person’s Admin authorization from either the Admin’s profile page or the Admins area of the Manage section.
Removing Admin Authorization from the Manage Section
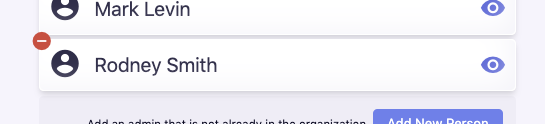
Within the Admins area of the Manage section is a list of Admins. If you hover over one of the name cards, a red circle with a “-” in it will appear on the top left corner of the card. If you click it, a box with a red trash can icon will pop up and ask you to “Confirm Removal?” If you click the red trash can icon, the person will be removed as an Admin and their name card will disappear from the list. Simultaneously, a green confirmation notice will pop up at the top of the page that says, “Successfully updated this person’s admin status”.
{info}NOTE: Removing a person as an Admin does not remove them from the organization or any of the groups they are in.
Removing Admin Authorization from a Profile Page
On an Admin’s profile, you can also remove a person’s Admin authorization by clicking the grey oval “Disable Admin Authorization” button on the upper right side of the page. When you do, a green confirmation notice will pop up at the top of the page that says, “Successfully updated this person’s admin status” and then the Admin heading will disappear from the page.
Can someone I have given Admin access revoke my admin authorization?
Yes. Be certain of whom you grant Admin authorization.
Reports
The “Reports” area shows you all of the reports you have created to use in your organization. Within this Reports area, you can also create new reports or edit existing ones.
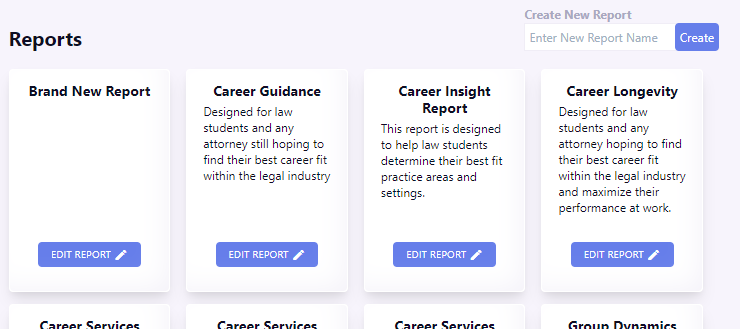
Each white box represents one report and has the report title at the top, a short description of the report in the middle, and a blue button at the bottom that says, “Edit Report,” so that you can edit the report.
What is a report?
A report uses a person’s psychological data gathered by a wizard to fill in a report template around whatever subjects the report creator chooses.
Create a Report
Click Manage in the navigation bar to your left. Midway down the Manage page is a “Reports” heading. On the top right of the Reports area is grey text that says, “Create New Report.”
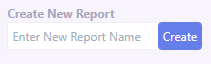
Click inside the box that reads, “Enter New Report Name.” Give your new report a name and click the blue “Create” button on the right.
You will navigate to a new report page on which you can establish your report’s details, compose a report introduction, and build your report by dragging and dropping your desired report sections.
View a Report
You cannot view a report with the full text filled in as it would be for one of your people until there is a person’s data to fill it in with.
Our suggestion would be to assign yourself the report from your own personal detail page, and view a test report with your data in each of the sections to see if it has the content, arrangement and overall presentation you desire before distributing a brand new report.
Edit Reports
On the Manage page and under the Reports heading, you will see white report boxes.
Each white report box represents one report and has the report title, a short description of the report, and a blue button at the bottom that says, “Edit Report.”
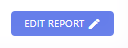
Click the blue “Edit Report” button and the Report page will open for you to edit.
{warning} When you edit a report, it changes the report across ALL of the groups and people that are using it. So, if you only need to edit a report for one group, it would be best to make another report that has your desired revisions, give it a different title, delete the old report from the group, and add the new report to the group.
Delete a Report
At this time we have not made it possible to delete a report from inside the application. In the event you need to delete a report, contact us and we can help!
Explore: Wizards & Assessments
The Explore: Wizards & Assessments area contains all of the wizards and/or assessments that your organization has at its disposal.
{warning} The Explore: Wizards and Assessments section here is currently under construction
How can I change my Organization Shortcode?
If you’re changing your organization’s name, and want to also change the shortcode so that people don’t see the old organization’s name in the email links, contact us we will change it for you manually.